GoDaddy DNS Instructions
> Welcome > Help and Training > Site Administration > Setting up a Custom Domain > Editing A Records in your DNS zone > GoDaddy DNS Instructions
Instructions for adding the A records in GoDaddy
- Login to GoDaddy
- Launch the Domain Control Center

- Click on the domain name you want to update.
- Click on the DNS Zone File tab, and then Edit:
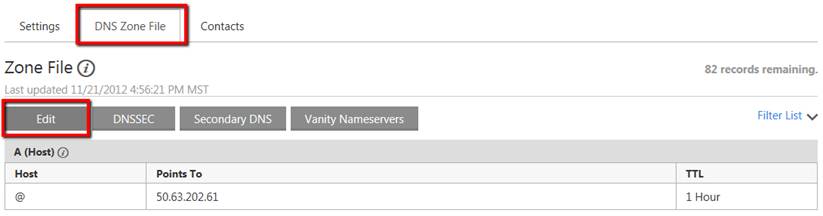
- *If you have an existing record as seen in the above image, edit it by moving your cursor over the record and selecting the edit icon:

Replace the existing IP address with 136.179.1.198
Or, if you have no existing record: Click Add Record

- From the Record type list, select A(Host)
Complete the following fields:- Host Name: Enter @
- Points to IP Address: Enter 136.179.1.198
- TTL: leave the default setting
- Click OK
- Click Add Record (to add second record)
From the Record type list, select A(Host)
Complete the following fields:- Host Name: Enter www
- Points to IP Address: Enter 136.179.1.198
- TTL: leave the default setting
- Click OK
- Click Save Zone File
- Click OK on the confirmation page. (The new A Record will display in the A (Host) section
If you have trouble editing your A Records refer to the GoDaddy tutorial page or contact GoDaddy support. You can refer to this scripted message when contacting their support.